Hello friends, today We want to share our assignments about microcontrollers. We consists of 4 people, they are:
- Juan Andrew (15/386462 / SV / 09848)
- Wachid Kurniawan Putra (17/416821 / SV / 14559)
- Yassir Dinhaz (17/416824 / SV / 14562)
- Zia Aryanti (17/416825 / SV / 14563)
We are Vocational College students at Gadjah Mada University who major in electrical engineering, this copter tower is our final semester assignment.
Without further ado let’s learn when making this project
Step 1: Preparation
First thing you need to do is prepare everything that necessary to make this project, below are list of parts and a brief explanation about them
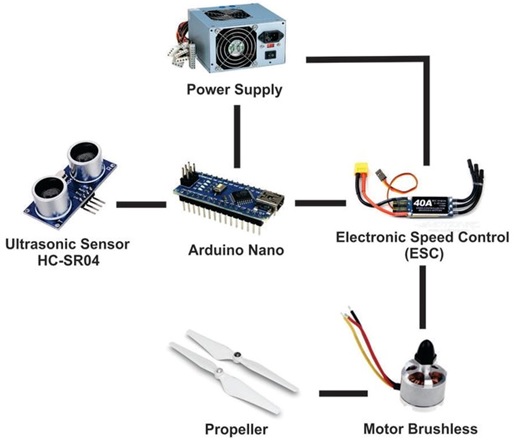
1.Arduino Board (I’m using Uno at this project)
Arduino is a microcontroller that are used for brain of this project, arduino is a programmable microcontroller that are acting like a mini computer, they can read or write numbers based on how it is programmed
2.Ultrasonic Sensonic
Ultrasonic Sensor is a sensor that are used to determine distance by using echo of the sound it generated
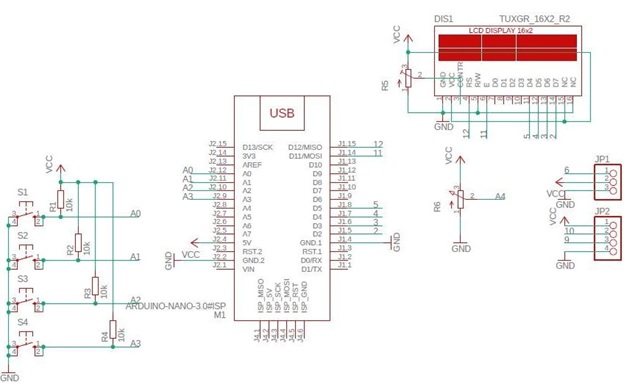
How It Works – Ultrasonic Sensor emits an ultrasound at 40 000 Hz which travels through the air and if there is an object or obstacle on its path It will bounce back to the module. Considering the travel time and the speed of the sound you can calculate the distance. The HC-SR04 Ultrasonic Module has 4 pins, Ground, VCC, Trig and Echo. The Ground and the VCC pins of the module needs to be connected to the Ground and the 5 volts pins on the Arduino Board respectively and the trig and echo pins to any Digital I/O pin on the Arduino Board.
3.LCD Display 16X2
LCD display is a device that can be used to display data from our sensors, because we need sensors to be precise all the time displaying real time value of sensor reading value is necessary and critical to improve and fix our project miss or fault if it happened (It happened a lot);
4.Electronic Speed Control
An electronic speed control or ESC is an electronic circuit that controls and regulates the speed of an electric motor. It may also provide reversing of the motor and dynamic braking. Miniature electronic speed controls are used in electrically powered radio controlled models. Full-size electric vehicles also have systems to control the speed of their drive motors.
5.Propeller and Brushless Motor
Propeller and Brushless motor is the core of this project because this is the Copter, brushless Motor may be expensive but with ESC the speed and rpm are easy to maintain and controlled. Because of that instead of using regular DC motor we use Brushless Motor.
6.Power Supply or Battery
Power supply or battery are the heart of this project, without power supply or battery your motor could not rotate and could not generate force to spin the propeller.Battery for the Brushless DC motor are 12Volts (we use LiPo) or you can change it with ac power supply and connect it to ESC as power souce for the motor
7.Potentiometer and push button
In our Model we use potentiometer and push button to adjust height of the towercopter.
Step 2: Electric Component Construction
Step 3: Mechanical Component Construction
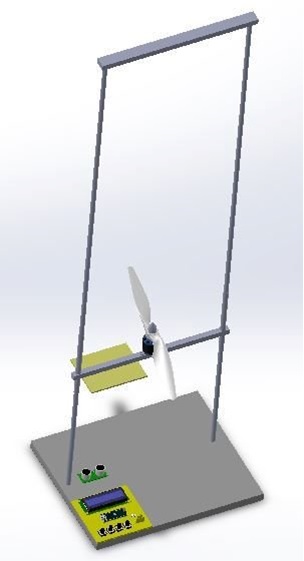
For Mechanical Contstruction you will need 4 core parts, we made our parts with aluminium so that it are rigid and strong while weigh pretty light.
Four Core Components are;
1.The Bottom( Base)
Base are pretty easy to construct you will need a square aluminium to be used as a base and foundation of the tower
drill the base to place double tower
2.The Double Tower
Two identical alumunium rod that are attached to the base
3.Propeller Stand
place where you place your propeller and receptor drill both side and place it in the two tower
4.Top Member
lid that prevent propeller to fly away
you can use our design as an example our design are displayed in the step title
We also upload on https://www.instructables.com/id/Tower-Copter-With-Ultrasonic-Sensor/
malam kak, mohon maaf mau bertanya. untuk syntax ini bagaimana fungsi untuk di tower copternya ya?
total = total – baca[index];
baca[index] = distance;
total = total + baca[index];
index = index+1;
if(index >= nbaca){
index = 0;
terimakasih
pid scope?