• Tentang UGM
  • PIKA UGM
  • Sekolah Vokasi
  • Departemen TEDI
  • Fahmizal Blog
Universitas Gadjah Mada Menara Ilmu Otomasi
Departemen Teknik Elektro dan Informatika
Sekolah Vokasi Universitas Gadjah Mada
  • Beranda
  • Penelitian
    • Control and Automation System
    • Internet of Things (IoT)
    • Deep Learning
    • Robotics
      • Humanoid Robot
      • Self-driving Car Robot
      • Mobile Robot
      • Arm Manipulator Robot
      • Unmanned Aerial Robot
      • Underwater Robot
    • Covid-19
      • Face Shield
      • Ventilator
      • UVD Mobile Robot
      • UVC Box Sterilizer
    • Capstone Project
    • Publikasi
  • Berita
  • Artikel
  • Buku
  • Video
  • Tentang
    • Tim Menara Ilmu
    • Makna Logo
    • Kontak
  • Beranda
  • Artikel
  • 3-DOF Hover CAD Design

3-DOF Hover CAD Design

  • Artikel
  • 9 January 2020, 08.19
  • Oleh: fahmizal
  • 0

Hello friends! In this article, we will share about 3 DOF Hover and how to design it using Solidworks Software. Happy Reading fella!


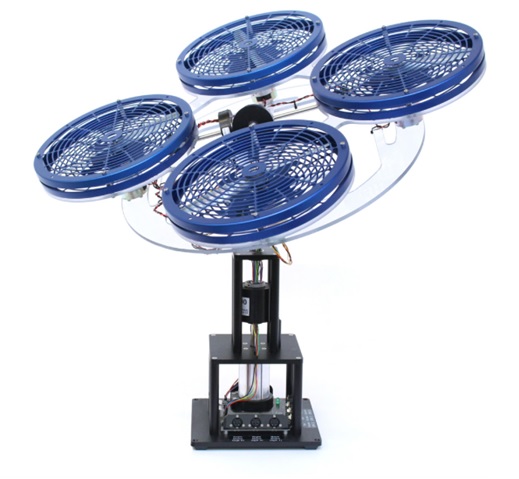
The 3 DOF Hover consists of a planar round frame with four propellers. The frame is mounted on three degrees of freedom pivot joint that enables the body to rotate about the roll, pitch and yaw axes. The propellers are driven by four DC motors that are mounted at the vertices of the frame. The propellers generate a lift force that can be used to directly control the pitch and roll angles. The total torque generated by the propeller motors causes the body to move about the yaw axis. Two of the propellers are counter-rotating so that the total torque in the system is balanced when the thrust of the four propellers is approximately equal. The voltage signals going to the motors, as well as the pitch and yaw encoder signals, are transmitted through a slip ring. The slip ring removes the need for wires and allows for 360 degrees free motion about the yaw axis. Furthermore, it reduces the amount of friction and loading about the moving axis. 

After knowing a little about 3 DOF Hover lets try to make the design. 

The First Step: The first thing that we have to do is make each part of the 3 DOF Hover or you can use our part from the from our member grabcad’s account by click on this link below:

https://grabcad.com/library/3-dof-hover-1 


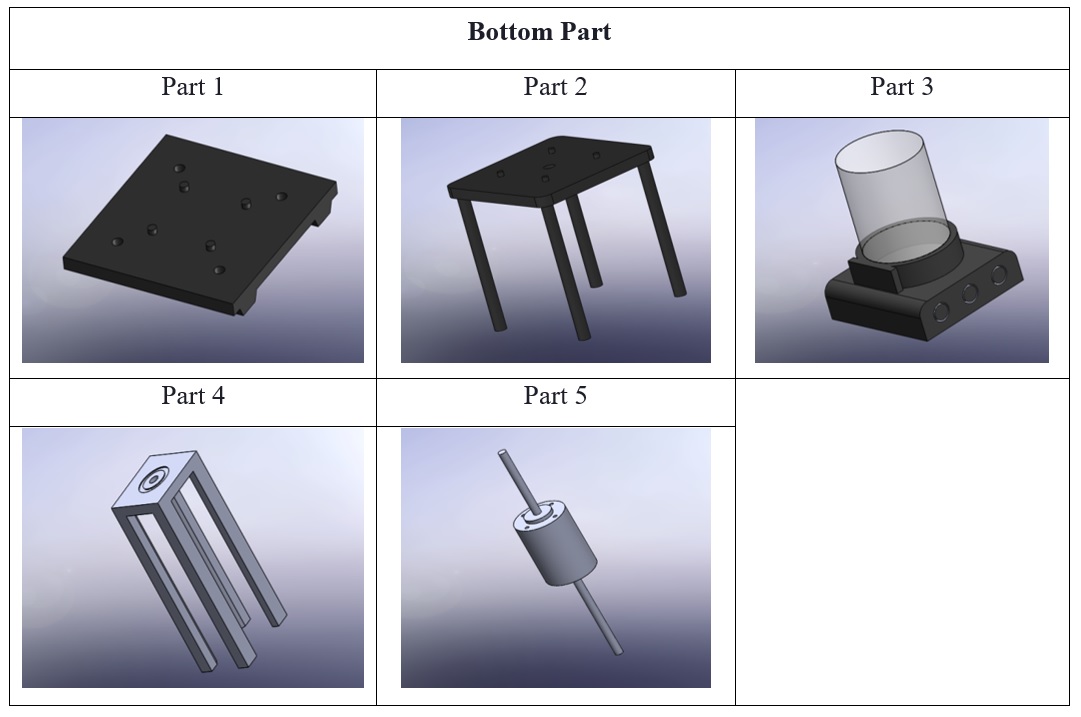
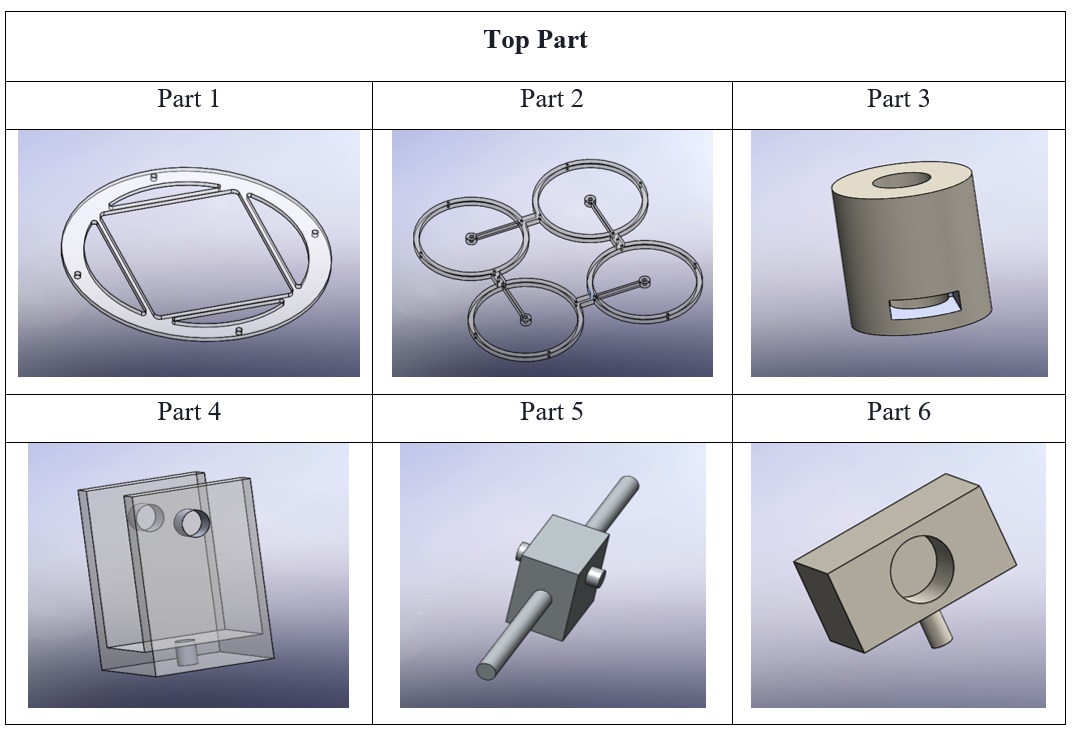
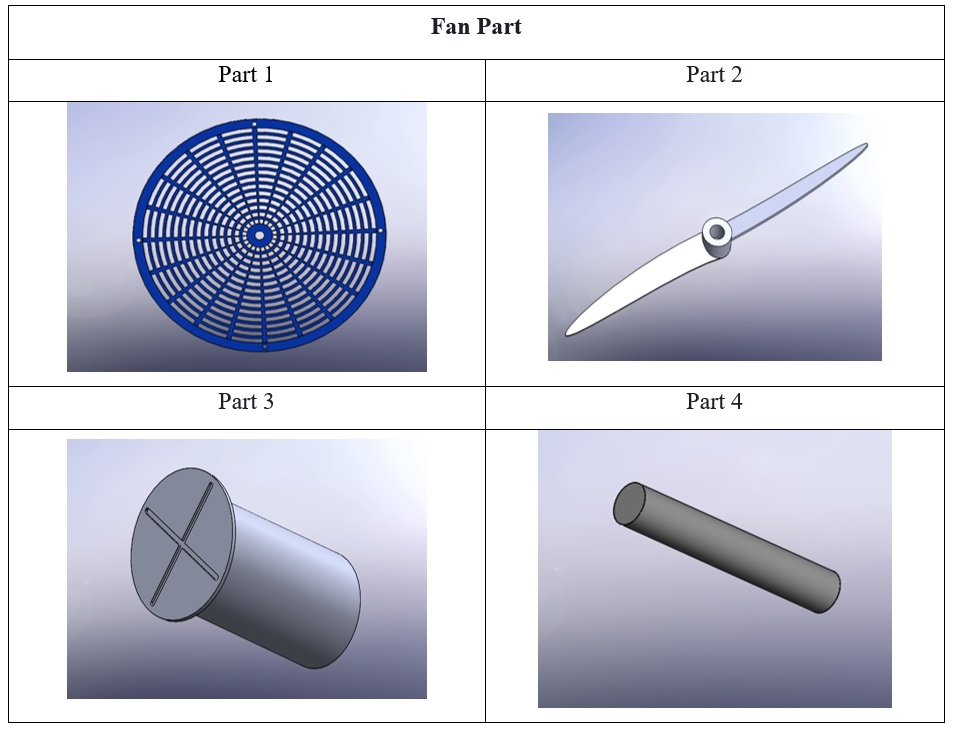
The following are the pictures of the part we have made: 

The Second Step:

The second thing that we have to do is assemble each part that you have until it becomes a 3 DOF hover. Here the picture of 3 DOF Hover after we finished the assembly step. I also post a tutorial video of the 3 DOF Hover on Youtube. Link for the video is the following.

Thank you for reading.

Designed by:

  1. Muffida Kurnalia Yovika Putri (19/447079/SV16798)
  2. Alam Ega Kumara (19/447071/SV/16790)
  3. Nabilla Destrianty (19/447292/SV/16986)


Tags: 3-DOF Hover CAD Design CAD Design

Leave A Comment Cancel reply

Your email address will not be published. Required fields are marked *

*

This site uses Akismet to reduce spam. Learn how your comment data is processed.

Recent Posts

  • Rancang Bangun Flight Controller UAV Berbiaya Rendah menggunakan STM32F411 dan GY-87 dengan Integrasi iNAV
  • Implementation of Steering Based Path Following on Prototype Self-driving Car Robot using Pixy2 Vision
  • Prototyping Self-driving Car Robot using Pixy2 Camera and ESP32
  • Simulasi Robot Line Follower berbasis Robot Operating System (ROS)
  • Prototipe Sistem Solar Tracker dengan Monitoring Internet of Things (IoT) berbasis Blynk

Recent Comments

  • Bakti prapdanu on Timer 5 Minutes Circuit Design Using IC NE555
  • Rosyid on Timer 5 Minutes Circuit Design Using IC NE555
  • Milda Nawaksari on Tutorial Labview dengan Arduino
  • Aphithep on Tower Copter With PID Controller
  • Dinie Hakim on Automatic Dump with Arduino Uno
Universitas Gadjah Mada

Departemen Teknik Elektro dan Informatika, Sekolah Vokasi, Universitas Gadjah Mada
Jl. Grafika No. 2 Kampus UGM, Yogyakarta 55281

Penanggung Jawab : Dr. Fahmizal, S.T., M.Sc.

Site: http://fahmizal.staff.ugm.ac.id

Email : fahmizal@ugm.ac.id


Recent Comments

  • Bakti prapdanu on Timer 5 Minutes Circuit Design Using IC NE555
  • Rosyid on Timer 5 Minutes Circuit Design Using IC NE555
  • Milda Nawaksari on Tutorial Labview dengan Arduino
  • Aphithep on Tower Copter With PID Controller
  • Dinie Hakim on Automatic Dump with Arduino Uno

© Sekolah Vokasi Universitas Gadjah Mada

KEBIJAKAN PRIVASI/PRIVACY POLICY

[EN] We use cookies to help our viewer get the best experience on our website. -- [ID] Kami menggunakan cookie untuk membantu pengunjung kami mendapatkan pengalaman terbaik di situs web kami.I Agree / Saya Setuju